Table of contents
Verifying smart contracts on blockchain explorers is essential for both developers and regular users. Verifying process makes it possible for everyone to check smart contracts' codes. By comparing the submitted source code to the code executed at the contract address, the procedure enables anyone working with a given contract to be certain of its logic.
Although some blockchain explorers like etherscan have their verifying systems, it can be a time-consuming process even if there are multiple smart contracts to be verified. So, using Hardhat's hardhat-etherscan plugin makes the whole verifying process more smooth and faster. However, in the Web3 ecosystem where many new blockchains exist, it is so usual that not all networks are supported. There is a way to verify smart contracts for unsupported networks using hardhat-etherscan plugin, and here is the guide for it.
Getting Started
This guide focuses on verifying smart contracts, not deploying them.
It is assumed that you have already a hardhat project and deployed smart contracts.
If hardhat-etherscan is not installed yet, run
npm install --save-dev @nomiclabs/hardhat-etherscancommand to install it. Then, addrequire("@nomiclabs/hardhat-etherscan");in yourhardhat.config.jsfile.Let's say that you have deployed smart contracts on Evmos Mainnet which is not supported network by hardhat-etherscan.
The final version of the codes is shared at the end of the guide.
Action
Run
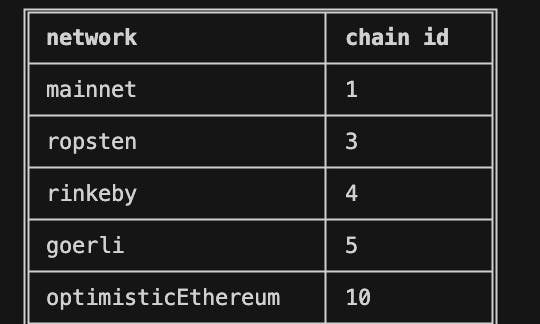
npx hardhat verify --list-networkscommand to see supported networks. The output should include a table of networks and related chain ids.
Since the chain that you use is not supported (Evmos in this guide), you should add custom network settings in
etherscansection ofhardhat.config.js.To add it, the chain id of the network, the URL of the verification endpoint, and the URL of the explorer are needed.
Chainlist is a reliable resource to get chain ids.
URLs of verification endpoint and explorer are depends on the explorer that you want to use.
For Evmos mainnet;
- Chain Id: 9001
- URL of the verification endpoint: blockscout.evmos.org/api
- URL of the explorer: blockscout.evmos.org
Add them in the
customChainsofetherscansection inhardhat.config.jsetherscan: { apiKey: { avalanche: process.env.SNOWTRACE_API_KEY, avalancheFujiTestnet: process.env.SNOWTRACE_API_KEY, }, customChains: [ { network: "evmos", chainId: 9001, urls: { apiURL: "https://blockscout.evmos.org/api", browserURL: "https://blockscout.evmos.org/", }, }, ], }Now, you defined
evmosnamed chain. But, the verification process mostly requires an API key that is provided by the explorers. Thus, you need to defineevmosAPI key inapiKeysection inetherscan.
\Some explorers do not need API key, however, you should define a placeholder variable nevertheless. *The name of the network in thecustomChainsobject should be the same as the network name in*apiKey.etherscan: { apiKey: { avalanche: process.env.SNOWTRACE_API_KEY, avalancheFujiTestnet: process.env.SNOWTRACE_API_KEY, evmos: "placeholder string", }, customChains: [ { network: "evmos", chainId: 9001, urls: { apiURL: "https://blockscout.evmos.org/api", browserURL: "https://blockscout.evmos.org/", }, }, ], }Check if it is added properly by running
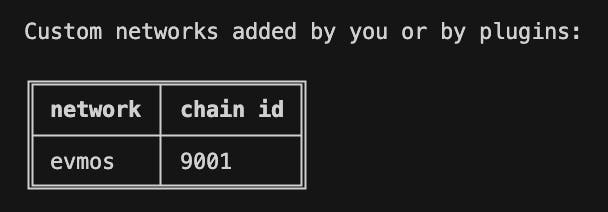
npx hardhat verify --list-networks. The output should be like this.
Then, you can use
npx hardhat verify --network NETWORK_NAMEcommand to verify smart contracts on non-supported chains.
It should be like this.
npx hardhat verify --network evmos DEPLOYED_CONTRACT_ADDRESS
Sample File
The sample hardhat.config.js file is added below. You can adjust it based on your needs. To make it clear, only the custom network is evmos.
require("@nomiclabs/hardhat-ethers");
require("@nomiclabs/hardhat-etherscan");
require("dotenv").config();
/** @type import('hardhat/config').HardhatUserConfig */
module.exports = {
solidity: {
compilers: [
{
version: "0.8.9",
},
],
},
networks: {
hardhat: {},
avalanche_fuji: {
url: "https://api.avax-test.network/ext/bc/C/rpc",
chainId: 43113,
accounts: [process.env.PRIVATE_KEY],
},
evmos: {
url: "https://eth.bd.evmos.org:8545",
chainId: 9001,
accounts: [process.env.PRIVATE_KEY],
},
},
 etherscan: {
     apiKey: {
       avalanche: process.env.SNOWTRACE_API_KEY,
       avalancheFujiTestnet: process.env.SNOWTRACE_API_KEY,
       evmos: "placeholder string",
     },
     customChains: [
       {
         network: "evmos",
         chainId: 9001,
         urls: {
           apiURL: "https://blockscout.evmos.org/api",
           browserURL: "https://blockscout.evmos.org/",
         },
       },
     ],
},
};
If you have any comments or issues regarding this guide, please let me know by commenting here or contact on Twitter.
