How to Build Tic Tac Toe Game with Solidity
Building Tic Tac Toe Game dApp with using Solidity, Hardhat, React.
After famous DeFi Summer, P2E (Play to Earn) games become very popular. Thus, building a game on blockchain with Solidity is both essential and funny. I had to develop a project as a final project of the practicum that is organized by Patika.dev and I picked building Tic Tac Toe game which is very simple and entertaining.
I am in a journey of a being a Web3 developer, I had developed some projects with following tutorials and lessons but it would be my first dApp to code from scratch. So, chose easier game to code. Enough talking, let's start!
Note: I assume that reader has basic knowledge about blockchains and development tools. I try to explain everything step by step but if you need much more detailed and organized course, check the article which I listed great resources.
The goal of the game is to be the first player to get three in a row on a 3-by-3 grid.
If you wonder how it will look after building, check my dApp or GitHub repo.
Rules
Player who create a game is defined as Player 1.
Game starts by Player 1.
Reward pool is determined by player who create a game. (RewardPool=2∗EntryFee)
Winner gets all reward pool excluding commission.
If there is no winner (in case of draw) each player get their entry fee back. No commission for draw.
If anyone doesn't join an existing game for 1 day at least, creator of that game (Player 1) will be able to cancel that game and get their entry fee back.
Coding
This is our guideline to follow while developing a dApp.
Preparing local development environment. This part may be confusing for beginners, so I try to explain everything step by step. We will have two folders in our project folder,
hardhatandfrontend. We usehardhatwhile doing stuffs related to smart contracts, usefrontendwhile building our website.Writing a smart contract. We will write all logic related to the game in there. It's where Solidity plays a role. How to create a game, make a move, decide winner, give reward to winner...
Testing smart contract logic before deploy to the blockchain. This part is generally ignored but, trust me, it saves a lot of time and finding bugs is much more easy with testing. It's where Hardhat plays a role.
Deploying smart contract to the blockchain. We'll play our game on testnets such as Goerli (Ethereum testnet), Fuji (Avalanche testnet). There is no real fund on testnets, so you and others can try your dApp without using real money. Anyone in the world will be able to play our game. It's where Hardhat plays a role.
Building a website which will let people easily connect their wallet and play our game by calling functions on our smart contract. It's where Node.JS, React.JS and ethers.js play a role.
It's easy, right? Let's build it!
Preparing Local Development Environment
Open a terminal, create a project folder where you want in your local. Then create hardhat folder and get in.
mkdir tic-tac-toe
cd tic-tac-toe
mkdir hardhat
cd hardhat
in hardhat folder;
npm init --yesto initialize our projectnpm i --save-dev hardhatto install hardhatnpx hardhatto run hardhat. Say yes to everything when you are asked.npm install --save-dev @nomiclabs/hardhat-waffle ethereum-waffle chai @nomiclabs/hardhat-ethers ethersto install the modules will be used in the project.
If you want to learn more about npm, this article explains essential topics very clearly.
Our folder structure is ready! Let's write a code!
Writing a Smart Contract
Delete Lock.sol under contracts folder, then, create TicTacToe.sol which will be our fancy game contract. 😎
There will be Games array which will include Game structs which holds parameters below;
Game ID,
Creating time,
Player1 address,
Player2 address,
Reward pool,
isStarted boolean,
Next move address,
Game board (3x3) matrix,
Winner
There will be startGame, joinGame, makeMove functions to play the game. Also, isGameFinished function will be used to check a game is finished after a move. And, of course, claimRewards function for claim earned rewards. 💸
If I explain all functions step by step, article would have to be very long. So, whole code in TicTacToe.sol is accessible here. Please read comments and try to understand. In case of any trouble, contact me.
Testing Smart Contract Logic
After (while) writing our contracts, we should test if our contract works properly. For example, we expect that isStarted boolean must be true if Player2 joins an existing game. It's possible to deploy your contract to blockchain and then test it by yourself but it is much more easy to simulate blockchain thanks to test skills of Hardhat. To create a test file, delete existing file in test folder, create a new file TicTacToe.test.js.
The code snippet below is for testing of game starting and selecting game winner properly. beforeEach part runs every time automatically, so you don't need to copy-paste it if you test 10 different situation.
Copy the code into your test file, and run npx hardhat test in your terminal while you are in hardhat folder of the project.
const { assert, expect } = require("chai");
const { network, deployments, ethers } = require("hardhat");
const { BigNumber, utils } = require("ethers");

describe("TicTacToe Tests", function () {
  let contractFactory, contract;

  beforeEach(async () => {
    accounts = await ethers.getSigners();
    deployer = accounts[0];
    player1 = accounts[1];
    player2 = accounts[2];
    // Returns a new connection to the contract
    contractFactory = await ethers.getContractFactory("TicTacToe");
    contract = await contractFactory.deploy(5, 100);
    // Returns a new instance of the contract connected to player
    contractPlayer1 = contract.connect(player1);
    contractPlayer2 = contract.connect(player2);
  });

  it("create a game, join that game with different account", async () => {
    // Ideally, we'd separate these out so that only 1 assert per "it" block
    // And ideally, we'd make this check everything
    await contractPlayer1.startGame({ value: ethers.utils.parseEther("0.1") });
    await contractPlayer2.joinGame(1, {
      value: ethers.utils.parseEther("0.1"),
    });
    const game = await contract.games(1);
    assert.equal(game.isStarted, true);
  });

  it("play the game until P1 wins by row.", async () => {
    await contractPlayer1.startGame({ value: ethers.utils.parseEther("0.1") });
    await contractPlayer2.joinGame(1, {
      value: ethers.utils.parseEther("0.1"),
    });
    await contractPlayer1.makeMove(0, 0, 1); // first player play (0,0) cell at 1. game
    await contractPlayer2.makeMove(1, 1, 1); // second player play (1,1) cell at 1. game
    await contractPlayer1.makeMove(0, 1, 1);
    await contractPlayer2.makeMove(1, 2, 1);
    await contractPlayer1.makeMove(0, 2, 1);
    const game = await contract.games(1);
    const gameBoard = await contract.getGameBoard(1);
    assert.equal(game.winner, 1);
  });
});
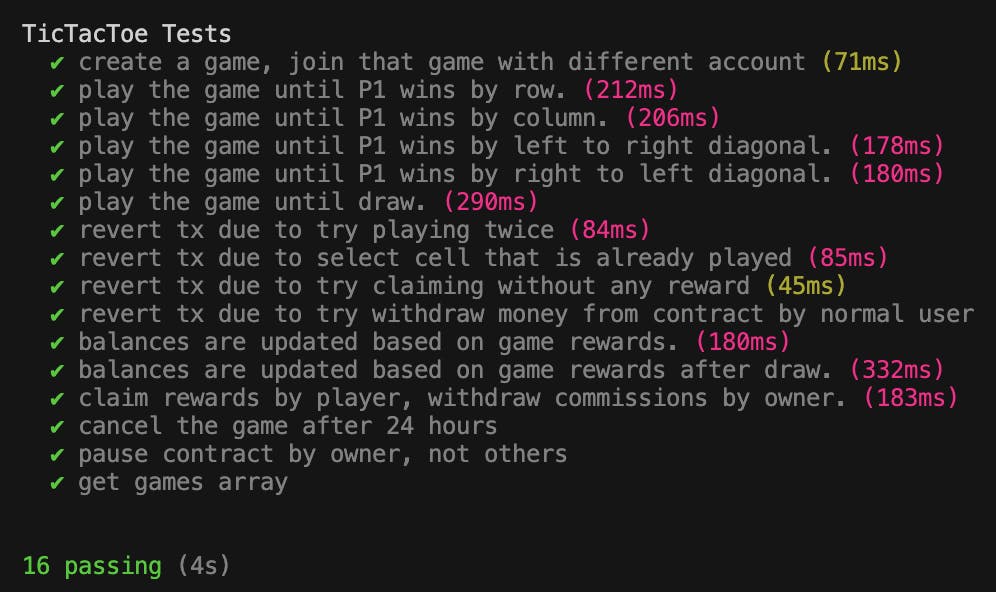
You should see output like that if everything goes well. Crucial part here is assert.equal(). You check whether game.winner equals to first player (if you are confused, check Winner enum in our smart contract) with assert function.

I've added much more testing while developing this dApp. Check here to access all tests that I made.

Deploying smart contract
We wrote the contract, tested it. We're ready to deploy it! scripts folder comes to the play now. We edit existing deploy.js file. If you don't have any file there, create a new one.
It basically get account information (signer information is needed to create a transaction on blockchain), get our contract information, then deploy it.
If you say Why there is 5 and 100 here? await contractFactory.deploy(5, 100), please check input parameters of constructor in our smart contract.
Let's run npx hardhat run scripts/deploy.js in terminal. Hardhat will deploy our contract to localhost. Wait! You said that we deploy it to blockchain to make it accessible public! Yes, we will deploy it to blockchain as well. Just scroll down a bit.
  const main = async () => {
  const [deployer] = await hre.ethers.getSigners();
  const accountBalance = await deployer.getBalance();

  console.log("Deploying contracts with account: ", deployer.address);
  console.log("Account balance: ", accountBalance.toString());

  const contractFactory = await hre.ethers.getContractFactory("TicTacToe");
  const contract = await contractFactory.deploy(5, 100);
  await contract.deployed();

  console.log("Contract address: ", contract.address);
};

const runMain = async () => {
  try {
    await main();
    process.exit(0);
  } catch (error) {
    console.log(error);
    process.exit(1);
  }
};

runMain();
To deploy smart contracts to blockchains (whether it is mainnet or testnet), you need;
a wallet (like Metamask),
RPC URL to connect blockchains.
It is required to pass your private key into the deploy file. BUT, YOU SHOULD NOT TO SHOW YOUR PRIVATE KEY PUBLICLY. NEVER. So, you should use dotenv package to avoid uploading the file that includes your private key into public such as GitHub.
Also, to get RPC URL, you will need to create an account on RPC Providers like Alchemy, Quicknode, Infura etc. I think you are a bit confused. No problem, please check Buildspace's page that explains how to use dotenv and get RPC URL. It's very well documented.
Okay, you have an account, enough fund on testnet (we continue with Goerli), installed dotenv and got your RPC URL as well. Sample .env file below.
# .env file
PRIVATE_KEY="YOUR_PRIVATE_KEY"
RPC_URL="YOUR_RPC_URL"
Now, we can edit hardhat.config.js file about informations which blockchain(s) we want to deploy our smart contracts on.
require("@nomicfoundation/hardhat-toolbox");
require("@nomicfoundation/hardhat-chai-matchers");
require("@nomiclabs/hardhat-ethers");

// Initialize `dotenv` with the `.config()` function
require("dotenv").config({ path: ".env" });

// Environment variables should now be available
// under `process.env`
const PRIVATE_KEY = process.env.PRIVATE_KEY;
const RPC_URL = process.env.RPC_URL;

// Show an error if environment variables are missing
if (!PRIVATE_KEY) {
  console.error("Missing PRIVATE_KEY environment variable");
}

if (!RPC_URL) {
  console.error("Missing RPC_URL environment variable");
}

module.exports = {
  solidity: "0.8.17",
  networks: {
    goerli: {
      url: RPC_URL,
      accounts: [PRIVATE_KEY],
    },
  },
};
After that, all needed to run deploy code that we run before with a small but powerful addition. npx hardhat run scripts/deploy.js --network goerli
It may take some time based on network activity around 2-3 minutes. Then, your contract address will be prompted out on terminal.
Go to goerli version of etherscan and search for your contract address.
CONGRATS!!! You have created a smart contract, tested it, deploy into a testnet. It is now accessible globally.
The only think we need to do is building a website to make it easy for our users.
I stop this article here since it became too long than I thought. 🤯 I'll continue later for front-end.
If you like this content, please give a comment, share it and tag me. If you don't like, please give a feedback.
I'm doing #100DaysOfWeb3 and #100DaysOfCode challenge on Twitter, and it is 57. Day! 😮 Come and join my journey!
